Installation of 11.2.0.2 Grid Infrastructure Solaris 10
Hi,
This article will be useful for Installing Oracle 11.2.0.2 grid Infrastructure for a standalone server.
Oracle Database 11g Release 2 makes it easier to configure and incorporate many of the grid computing features that were only available in a Real Application Clusters (RAC) clustered database environment in previous releases for a single-instance Oracle database. This article will be useful for Installing Oracle 11.2.0.2 grid Infrastructure for a standalone server on Oracle Solaris 10 U9.
1) Download patchset from http://support.oracle.com
p10098816_112020_SOLARIS64_3of7.zip 918M (963322837 bytes) Download
The third zipped file contains the grid infrastructure software.
2) Make sure all the pre-requistes exists on the server.
You need to have following patches and packages Installed on your server:
pkginfo -i SUNWarc SUNWbtool SUNWhea SUNWlibC SUNWlibms SUNWsprot \
> SUNWtoo SUNWi1of SUNWi1cs SUNWi15cs SUNWxwfnt
List of patches:
120753-06: SunOS 5.10: Microtasking libraries (libmtsk) patch
• 139574-03: SunOS 5.10
• 119963-14: SunOS 5.10: Shared library patch for C++
• 124861-15: SunOS 5.10 Compiler Common patch for Sun C C++ (optional)
• All mentioned below patches are required if you are using Database Smart Flash Cache (An Enterprise Edition only feature.)
• 125555-03
• 140796-01
• 140899-01
• 141016-01
• 139555-08
• 141414-10
• 141736-05
Installed patches can be checked by command:
/usr/sbin/patchadd -p | grep
Configure kernel parameters:
#projadd -U oracle user.ora11g
#projmod -s -K "project.max-sem-ids=(priv,100,deny)" user.ora11g
#projmod -s -K "process.max-sem-nsems=(priv,256,deny)" user.ora11g
#projmod -s -K "project.max-shm-memory=(priv,12025908428,deny)" user.ora11g
#projmod -s -K "project.max-shm-ids=(priv,100,deny)" user.ora11g
#projmod -s -K "process.max-file-descriptor=(priv,65536,deny)" user.ora11g
Note: All these kernel parameters are configured as per 16 GB of RAM
New kernel parameters introduced in 11.2.0.2
# ndd -set /dev/udp udp_smallest_anon_port 9000
# ndd -set /dev/udp udp_largest_anon_port 65500
# ndd -set /dev/tcp tcp_smallest_anon_port 9000
# ndd -set /dev/tcp tcp_largest_anon_port 65500
3) Create directories, change permissions and ownership:
bash-3.00# mkdir 11g_Grid
bash-3.00# chmod -R 775 /OrApps/11g_Grid/
bash-3.00# chown -R ora11g:dba /OrApps/11g_Grid/
-> Create environment variables:
ORACLE_BASE=/OrApps/11g_Grid/
ORACLE_HOME=/OrApps/11g_Grid/1120_Grid
4) Configuring ASM Disk group DISK on OS:
Also we need to create as ASM Disk group during Installation. So we need to grant proper privileged to disk PATH, so that it can discover the DISK path at installation.
I used /dev/rdsk/c1t0d0s5 for ASM DISKGROUP
bash-3.00# chmod -R 775 /dev/rdsk/c1t0d0s5
bash-3.00# chown -R ora11g:dba /dev/rdsk/c1t0d0s5
5) Make sure Display is set to a proper value.
6) Unzip the patchset in stage directory
7) Execute Installation file (runInstaller)
8) Follow step by step procedure:
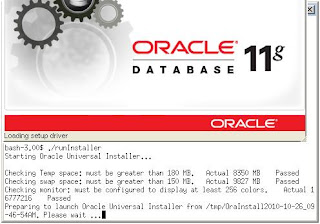
-> Execute Installer file from oracle user
Skip first screen for downloading software and updates.
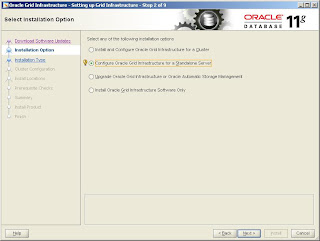
-> select configure Oracle grid infrastructure for a standalone server
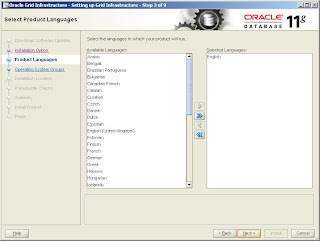
-> Select additional language which you want to configure
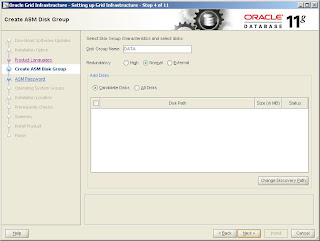
-> Specify the Name of disk group and Disk path which you want to configure. I created this Disk group with external redundancy. In normal redundancy you need to have minimum of two disk paths.
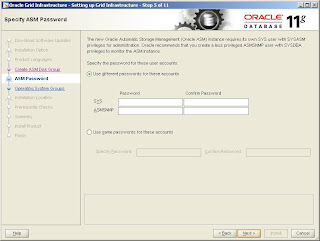
->I have selected same password option as this is test Server. We can configure different password.
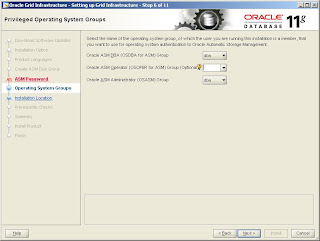
-> Select groups for Oracle ASM users.
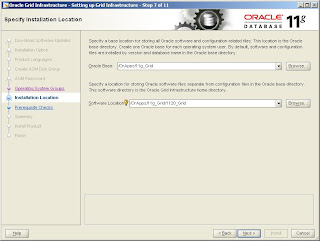
-> Specify the location of $ORACLE_BASE and $ORACLE_HOME path.
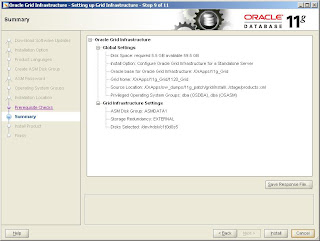
-> This screen will summarize the products it will install and display the configuration settings.
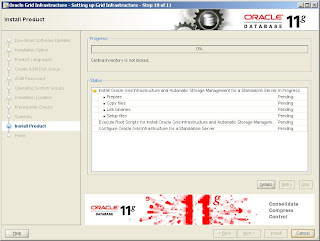
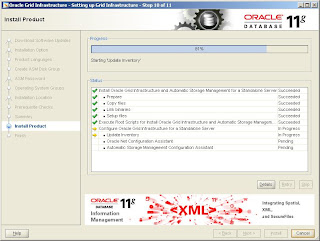
-> Installation progress.....
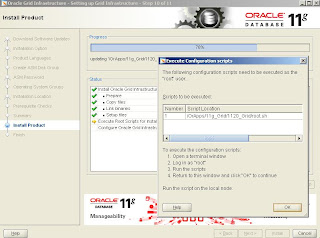
-> Run root.sh script as a root user. This script will configure all settings for Oracle grid infrastructure for a standalone server.
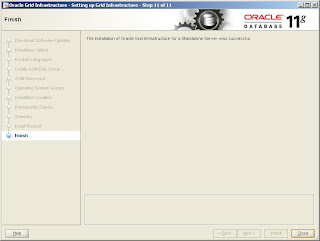
-> Installation completed successfully.
Now you can create database on ASM Disk group, migrate database on ASM Disk group.
In next post i will write an article for migrating normal filesystem database to ASM Diskgroup in 11.2.0.2 software.
Happy reading.
This article will be useful for Installing Oracle 11.2.0.2 grid Infrastructure for a standalone server.
Oracle Database 11g Release 2 makes it easier to configure and incorporate many of the grid computing features that were only available in a Real Application Clusters (RAC) clustered database environment in previous releases for a single-instance Oracle database. This article will be useful for Installing Oracle 11.2.0.2 grid Infrastructure for a standalone server on Oracle Solaris 10 U9.
1) Download patchset from http://support.oracle.com
p10098816_112020_SOLARIS64_3of7.zip 918M (963322837 bytes) Download
The third zipped file contains the grid infrastructure software.
2) Make sure all the pre-requistes exists on the server.
You need to have following patches and packages Installed on your server:
pkginfo -i SUNWarc SUNWbtool SUNWhea SUNWlibC SUNWlibms SUNWsprot \
> SUNWtoo SUNWi1of SUNWi1cs SUNWi15cs SUNWxwfnt
List of patches:
120753-06: SunOS 5.10: Microtasking libraries (libmtsk) patch
• 139574-03: SunOS 5.10
• 119963-14: SunOS 5.10: Shared library patch for C++
• 124861-15: SunOS 5.10 Compiler Common patch for Sun C C++ (optional)
• All mentioned below patches are required if you are using Database Smart Flash Cache (An Enterprise Edition only feature.)
• 125555-03
• 140796-01
• 140899-01
• 141016-01
• 139555-08
• 141414-10
• 141736-05
Installed patches can be checked by command:
/usr/sbin/patchadd -p | grep
Configure kernel parameters:
#projadd -U oracle user.ora11g
#projmod -s -K "project.max-sem-ids=(priv,100,deny)" user.ora11g
#projmod -s -K "process.max-sem-nsems=(priv,256,deny)" user.ora11g
#projmod -s -K "project.max-shm-memory=(priv,12025908428,deny)" user.ora11g
#projmod -s -K "project.max-shm-ids=(priv,100,deny)" user.ora11g
#projmod -s -K "process.max-file-descriptor=(priv,65536,deny)" user.ora11g
Note: All these kernel parameters are configured as per 16 GB of RAM
New kernel parameters introduced in 11.2.0.2
# ndd -set /dev/udp udp_smallest_anon_port 9000
# ndd -set /dev/udp udp_largest_anon_port 65500
# ndd -set /dev/tcp tcp_smallest_anon_port 9000
# ndd -set /dev/tcp tcp_largest_anon_port 65500
3) Create directories, change permissions and ownership:
bash-3.00# mkdir 11g_Grid
bash-3.00# chmod -R 775 /OrApps/11g_Grid/
bash-3.00# chown -R ora11g:dba /OrApps/11g_Grid/
-> Create environment variables:
ORACLE_BASE=/OrApps/11g_Grid/
ORACLE_HOME=/OrApps/11g_Grid/1120_Grid
4) Configuring ASM Disk group DISK on OS:
Also we need to create as ASM Disk group during Installation. So we need to grant proper privileged to disk PATH, so that it can discover the DISK path at installation.
I used /dev/rdsk/c1t0d0s5 for ASM DISKGROUP
bash-3.00# chmod -R 775 /dev/rdsk/c1t0d0s5
bash-3.00# chown -R ora11g:dba /dev/rdsk/c1t0d0s5
5) Make sure Display is set to a proper value.
6) Unzip the patchset in stage directory
7) Execute Installation file (runInstaller)
8) Follow step by step procedure:
-> Execute Installer file from oracle user

Skip first screen for downloading software and updates.

-> select configure Oracle grid infrastructure for a standalone server

-> Select additional language which you want to configure

-> Specify the Name of disk group and Disk path which you want to configure. I created this Disk group with external redundancy. In normal redundancy you need to have minimum of two disk paths.

->I have selected same password option as this is test Server. We can configure different password.
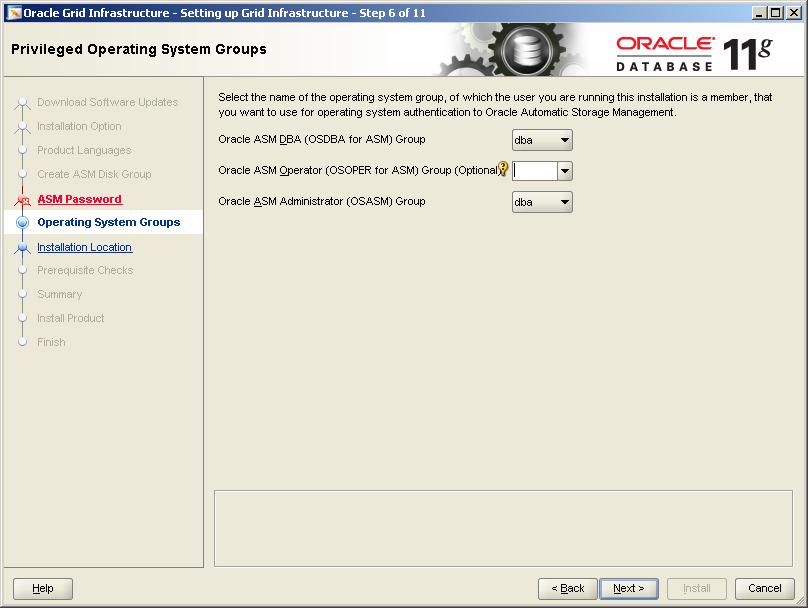
-> Select groups for Oracle ASM users.

-> Specify the location of $ORACLE_BASE and $ORACLE_HOME path.

-> This screen will summarize the products it will install and display the configuration settings.

-> Installation progress.....

-> Run root.sh script as a root user. This script will configure all settings for Oracle grid infrastructure for a standalone server.


-> Installation completed successfully.
Now you can create database on ASM Disk group, migrate database on ASM Disk group.
In next post i will write an article for migrating normal filesystem database to ASM Diskgroup in 11.2.0.2 software.
Happy reading.


Comments