Oracle Applications R12.1.1 Installation on Oracle Solaris 10 U9
This article describes all steps which are required for Installing Oracle Applications R12.1.1 on Oracle Solaris 10 U9 on Sparc-64 Bit.
Steps:
1) Verify the OS version
For Installing Apps Release 12.1.1 min OS version is Solaris 10
2) Verify the release of OS
3) Verify all required OS patches
List of OS Patches required for Solaris 10:
125100-04
120473-05
127111-02
137111-04
4) Verify Required packages:
List of required packages
SUNWuiu8
SUNWulcf
SUNWlibC
5) Other Software requirements:
ar
ld
make
X Display Server
Check for all these files exists in /usr/ccs/bin location.
Also make sure that you have Xdisplay Server configured on Machine.
6) Configure ulimit settings:
time (seconds) = unlimited
file (blocks) = unlimited
data (kbytes) = 4194303
stack (kbytes) = 65536
coredump (blocks) = unlimited
nofiles (descriptors) = 65536
vmemory (kbytes) = unlimited
7) Configure kernel parameters:
Recommended settings:
Solaris 10 (5.10)
rlim_fd_max 65536
noexec_user_stack 1
semsys:seminfo_semmni 100
semsys:seminfo_semmsl 256
shmsys:shminfo_shmmax 4294967295
shmsys:shminfo_shmmni 100
configured settings in /etc/system file as per 4 GB RAM
8) Host Name Settings:
Verify the /etc/hosts file for correct entries, the valid entries should be like:
127.0.0.1 localhost.localdomain localhost
ip_address node_name.domain_name node_name
There are some known Issues for this Installation, before starting Installation configure Server with below steps:
OPMN port conflict
By default, the OPMN service of the Application Server listens on port 6000 and this can conflict with X11 port used for the graphics on UNIX machine.
To avoid this issue:
1) check port 6000 is active
2) Shutdown the dtlogin process with the command "/usr/dt/bin/dtconfig -kill"
3) Confirm that nothing is listening at port 6000 ("netstat -a | grep 6000")
4) Disable the local X console for dtlogin with command "/usr/dt/bin/dtconfig -d"
5) Restart dtlogin with command "/usr/dt/bin/dtconfig -e"
RC-20200: Fatal: Could not find Unzip Error while Installing R12.1.1 on Solaris 10 U9
For more information on this issue refer:
http://appsdbaworkshop.blogspot.com/2010/10/rc-20200-fatal-could-not-find-unzip.html
9) Create Application, database users and group:
-> User applr12 is used for managing application tier services
-> User orar12 is used for managing database tier services
10) Verify the Disk Space with df -h command, for fresh Installation it needs 90 GB & for Vision Installation it needs 245 GB of free Disk space.
11) Create directory structure and grant appropriate permission on directory
12) Configure Stage Area
The stage area required 50 GB of Disk Space with additional NLS Supplement.
create Directories as below:
-> copy Start Here DVD in startCD
-> copy APPL_TOP DVD in oraApps
-> copy RDBMS DVD in oraDB
-> copy Tools in tools
-> copy Databases DVD in oraAppDB
-> copy additional NLS DVD in oraNLS
13) Verify Proper Display setting by running xclock.

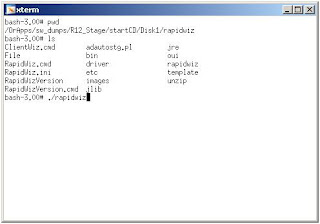
14) Run rapidwiz Installation utility from stage area
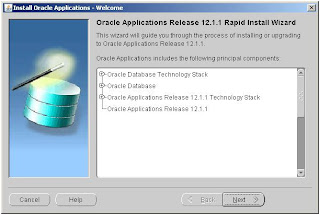
15) rapidwiz main Installation screen
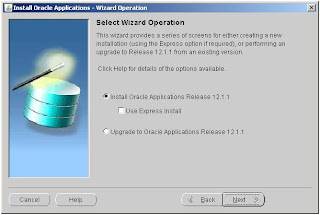
16) Screen for selection of Installation type
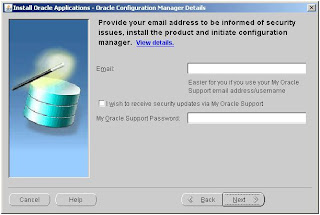
17) Screen to configure email with oracle support
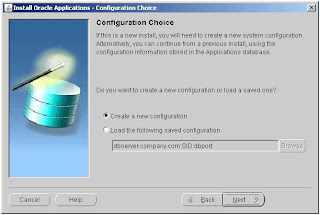
18) Screen for configuration file
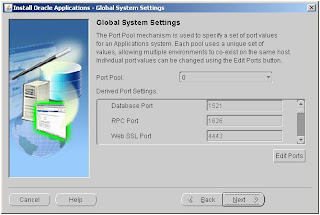
19) Screen for selecting ports to be used by application
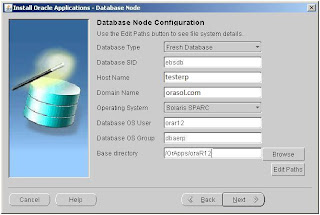
20) Screen to configure DB node
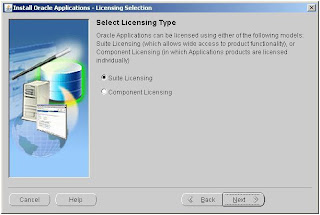
21) select type of licensing to be used in apps

22) Select additional licenses if any
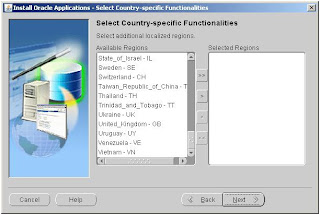
23) Select country specific functionality
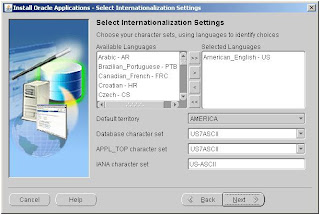
24) Select internationalization settings

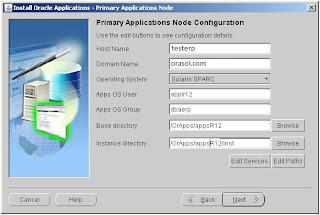
25) Application Node configuration
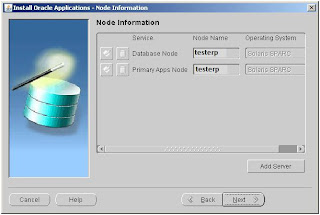
26) Node Information for Database and Application servers
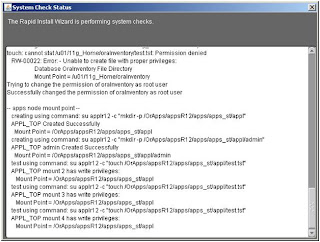
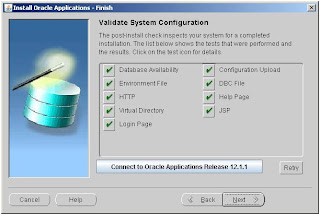
27) rapidwiz performing system checks to check any error for system configuration
28) System validation screen
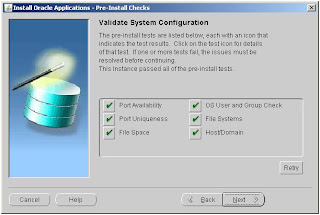
On this screen if found any errors need to be fixed before proceeding further for a successful Installation.
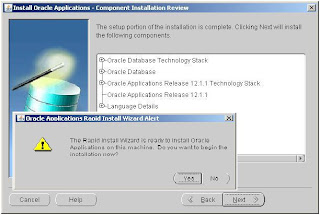
29) Screen Display what components rapidwiz will Install
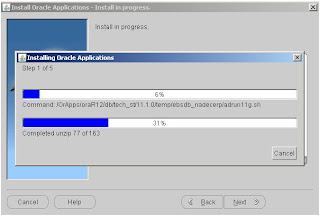
30) Installation progress screens

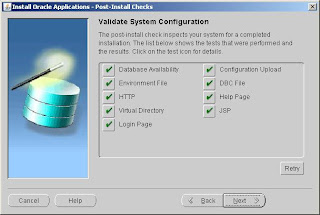
31) System configuration validation screen, this will check all required components Installed and configured properly
32) Installation completion screen
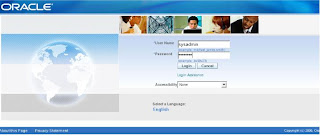
Login to applications with the valid URL, for this Installation application can be accessed with url http:testerp.orasol.com:8000
33) Login screen
References:
Oracle E-Business Suite Installation and Upgrade Notes Release 12 (12.1.1) for Oracle Solaris on SPARC (64-bit) [ID 761568.1]
Installation completed successful.
Happy reading :)
Steps:
1) Verify the OS version
bash-3.00$ uname -r
5.10
bash-3.00$
For Installing Apps Release 12.1.1 min OS version is Solaris 10
2) Verify the release of OS
bash-3.00$ cat /etc/release
                   Oracle Solaris 10 9/10 s10s_u9wos_14a SPARC
     Copyright (c) 2010, Oracle and/or its affiliates. All rights reserved.
                            Assembled 11 August 2010
bash-3.00$
3) Verify all required OS patches
List of OS Patches required for Solaris 10:
125100-04
120473-05
127111-02
137111-04
bash-3.00# /usr/sbin/patchadd -p | grep 125100-04
Patch: 144744-01 Obsoletes: 138219-01 Requires: 120473-05 124235-02 125100-04 125800-01 Incompatibles: Packages: SUNWcsl
bash-3.00# /usr/sbin/patchadd -p | grep 120473-05
Patch: 144744-01 Obsoletes: 138219-01 Requires: 120473-05 124235-02 125100-04 125800-01 Incompatibles: Packages: SUNWcsl
bash-3.00# /usr/sbin/patchadd -p | grep 127111
Patch: 127127-11 Obsoletes: 118557-09 118560-02 118562-14 118843-01 120046-01 120068-03 120737-01
/usr/sbin/patchadd -p | grep 137111
Patch: 137137-09 Obsoletes: 120741-01 120986-12 120992-02 121008-02 121274-01 121414-01
4) Verify Required packages:
List of required packages
SUNWuiu8
SUNWulcf
SUNWlibC
bash-3.00# pkginfo -i SUNWuiu8 SUNWulcf SUNWlibC
system      SUNWlibC Sun Workshop Compilers Bundled libC
system      SUNWuiu8 Iconv modules for UTF-8 Locale
system      SUNWulcf UTF-8 Locale Environment Common Files
bash-3.00#
5) Other Software requirements:
ar
ld
make
X Display Server
Check for all these files exists in /usr/ccs/bin location.
bash-3.00$ pwd
/usr/ccs/bin
bash-3.00$ ls -l ar
-r-xr-xr-x   1 root     bin        35796 Jun 28  2008 ar
bash-3.00$ ls -l make
-rwxr-xr-x   1 root     bin       245764 Dec  7  2006 make
bash-3.00$ ls -l ld
-rwxr-xr-x   1 root     bin        10704 Aug 10 20:51 ld
Also make sure that you have Xdisplay Server configured on Machine.
6) Configure ulimit settings:
time (seconds) = unlimited
file (blocks) = unlimited
data (kbytes) = 4194303
stack (kbytes) = 65536
coredump (blocks) = unlimited
nofiles (descriptors) = 65536
vmemory (kbytes) = unlimited
core file size        (blocks, -c) unlimited
data seg size         (kbytes, -d) unlimited
file size             (blocks, -f) unlimited
open files                    (-n) 4096
pipe size          (512 bytes, -p) 10
stack size            (kbytes, -s) 8192
cpu time             (seconds, -t) unlimited
max user processes            (-u) 29995
virtual memory        (kbytes, -v) unlimited
7) Configure kernel parameters:
Recommended settings:
Solaris 10 (5.10)
rlim_fd_max 65536
noexec_user_stack 1
semsys:seminfo_semmni 100
semsys:seminfo_semmsl 256
shmsys:shminfo_shmmax 4294967295
shmsys:shminfo_shmmni 100
configured settings in /etc/system file as per 4 GB RAM
set shmsys: shminfo_shmmni = 256
set semsys: seminfo_semvmx = 32767
#set sehmsys:shminfo_shmmax = 8589934592
set shmsys:shminfo_shmmax=12025908428
set shmsys: shminfo_shmseg = 50
set rlim_fd_max=65536
set rlim_fd_cur=4096
8) Host Name Settings:
Verify the /etc/hosts file for correct entries, the valid entries should be like:
127.0.0.1 localhost.localdomain localhost
ip_address node_name.domain_name node_name
bash-3.00$ cat /etc/hosts
#
# Internet host table
#
::1     localhost
127.0.0.1       localhost
192.168.1.11      testerp.orasol.com   testerp        loghost
bash-3.00$
There are some known Issues for this Installation, before starting Installation configure Server with below steps:
OPMN port conflict
By default, the OPMN service of the Application Server listens on port 6000 and this can conflict with X11 port used for the graphics on UNIX machine.
To avoid this issue:
1) check port 6000 is active
bash-3.00$ netstat -an | grep 6000
      *.6000               *.*                0      0 49152      0 LISTEN
      *.6000               *.*                0      0 49152      0 LISTEN
      *.6000                            *.*                             0      0 49152      0 LISTEN
bash-3.00$
2) Shutdown the dtlogin process with the command "/usr/dt/bin/dtconfig -kill"
3) Confirm that nothing is listening at port 6000 ("netstat -a | grep 6000")
4) Disable the local X console for dtlogin with command "/usr/dt/bin/dtconfig -d"
5) Restart dtlogin with command "/usr/dt/bin/dtconfig -e"
bash-3.00# cd /
bash-3.00# /usr/dt/bin/dtconfig -kill
done
dtlogin kill complete.
bash-3.00# netstat -a | grep 6000
bash-3.00# /usr/dt/bin/dtconfig -d
done
desktop auto-start disabled.
bash-3.00# /usr/dt/bin/dtconfig -e
done
desktop auto-start enabled.
bash-3.00#
RC-20200: Fatal: Could not find Unzip Error while Installing R12.1.1 on Solaris 10 U9
For more information on this issue refer:
http://appsdbaworkshop.blogspot.com/2010/10/rc-20200-fatal-could-not-find-unzip.html
9) Create Application, database users and group:
bash-3.00$ groupadd dbaerp
bash-3.00$ useradd -g dbaerp -d /home/applr12 -m applr12
bash-3.00$ useradd -g dbaerp -d /home/orar12 -m orar12
-> User applr12 is used for managing application tier services
-> User orar12 is used for managing database tier services
10) Verify the Disk Space with df -h command, for fresh Installation it needs 90 GB & for Vision Installation it needs 245 GB of free Disk space.
11) Create directory structure and grant appropriate permission on directory
bash-3.00# mkdir /OrApps/appsR12
bash-3.00# mkdir /OrApps/oraR12
bash-3.00# chmod -R 775 /OrApps/appsR12
bash-3.00# chmod -R 775 /OrApps/oraR12
bash-3.00# chown -R applr12:dbaerp /OrApps/appsR12
bash-3.00# chown -R orar12:dbaerp /OrApps/oraR12
12) Configure Stage Area
The stage area required 50 GB of Disk Space with additional NLS Supplement.
create Directories as below:
bash-3.00#mkdir /OrApps/sw_dumps/R12_Stage
bash-3.00#cd /OrApps/sw_dumps/R12_Stage
bash-3.00#mkdir startCD
bash-3.00#mkdir oraDB
bash-3.00#mkdir oraAppDB
bash-3.00#mkdir oraApps
bash-3.00#mkdir tools
bash-3.00#mkdir oraNLS
bash-3.00$ cd R12_Stage/
bash-3.00$ ls
oraAppDB                  oraDB                     tools                    startCD
oraApps                   oraNLS
bash-3.00$ pwd
/OrApps/sw_dumps/R12_Stage
-> copy Start Here DVD in startCD
-> copy APPL_TOP DVD in oraApps
-> copy RDBMS DVD in oraDB
-> copy Tools in tools
-> copy Databases DVD in oraAppDB
-> copy additional NLS DVD in oraNLS
13) Verify Proper Display setting by running xclock.

14) Run rapidwiz Installation utility from stage area

15) rapidwiz main Installation screen

16) Screen for selection of Installation type

17) Screen to configure email with oracle support

18) Screen for configuration file

19) Screen for selecting ports to be used by application

20) Screen to configure DB node

21) select type of licensing to be used in apps

22) Select additional licenses if any

23) Select country specific functionality

24) Select internationalization settings


25) Application Node configuration

26) Node Information for Database and Application servers

27) rapidwiz performing system checks to check any error for system configuration

28) System validation screen

On this screen if found any errors need to be fixed before proceeding further for a successful Installation.
29) Screen Display what components rapidwiz will Install

30) Installation progress screens


31) System configuration validation screen, this will check all required components Installed and configured properly

32) Installation completion screen

Login to applications with the valid URL, for this Installation application can be accessed with url http:testerp.orasol.com:8000
33) Login screen

References:
Oracle E-Business Suite Installation and Upgrade Notes Release 12 (12.1.1) for Oracle Solaris on SPARC (64-bit) [ID 761568.1]
Installation completed successful.
Happy reading :)

Comments