Installation of 12c Grid Infrastructure on linux - configure ASM on 12c GridInfrastructure on Linux-64bit
This article demonstrates how to Install and configure newly released Oracle 12c Grid Infrastructure software on Linux-64 bit on standalone system.
I have configured this on OEL 5.7 64bit virtual machine with 4GB RAM and single core processor.
There no much difference in Installation procedure though there some new screens Introduced in this release.
New Options:
1) screen for root/sudo password for running root.sh scripts
2) Edit configuration at "summary of Installation" screen
3) Performing Linux operations
This is my second post on Oracle Database 12c. If you're following the steps for configuring GI 12c then please perform all OS per-requisites listed in post of oracle 12 database Installation:
12c Database Installation
Steps for configuring standalone Oracle 12c Grid Infrastructure Software:
1) Install addition OS packages (oracleasm - rpms)
2) Configure oracleasm and create asmdisks
3) Configure directory privileges for GI sw
4) Install Oracle 12c GI software for standalone configuraiton
5) Verify services
6) Create additional ASM diskgroup
1) Install addition OS packages (oracleasm - rpms)
Verify "oracleasm" rpms exist on system if doesn't exists then please Install it.
[root@linux1 Server]# ls -lrt oracleasm*
-rw-r--r-- 1 root root  89845 Apr  6  2011 oracleasm-support-2.1.7-1.el5.x86_64.rpm
-rw-r--r-- 1 root root 136804 Jul 26  2011 oracleasm-2.6.18-274.el5xen-2.0.5-1.el5.x86_64.rpm
-rw-r--r-- 1 root root 138929 Jul 26  2011 oracleasm-2.6.18-274.el5debug-2.0.5-1.el5.x86_64.rpm
-rw-r--r-- 1 root root 136932 Jul 26  2011 oracleasm-2.6.18-274.el5-2.0.5-1.el5.x86_64.rpm
[root@linux1 Server]#
[root@linux1 ~]# rpm -qa | grep oracleasm
oracleasm-support-2.1.7-1.el5
oracleasm-2.6.18-274.el5debug-2.0.5-1.el5
oracleasm-2.6.18-274.el5-2.0.5-1.el5
[root@linux1 ~]#
2) Configure oracleasm and create asmdisks
> create parition on raw devices
- /dev/sdb -- Grid Infrastructure
- /dev/sdc -- Oracle Database
> configure oracleasm driver (user & owner of raw devices)
> create oracle asm disks
creation of partition:
[root@linux1 ~]# fdisk -l

Disk /dev/sda: 59.0 GB, 59055800320 bytes
255 heads, 63 sectors/track, 7179 cylinders
Units = cylinders of 16065 * 512 = 8225280 bytes

   Device Boot      Start         End      Blocks   Id  System
/dev/sda1   *           1        1275    10241406   83  Linux
/dev/sda2            1276        2040     6144862+  82  Linux swap / Solaris
/dev/sda3            2041        7179    41279017+  83  Linux

Disk /dev/sdb: 5368 MB, 5368709120 bytes
255 heads, 63 sectors/track, 652 cylinders
Units = cylinders of 16065 * 512 = 8225280 bytes

Disk /dev/sdb doesn't contain a valid partition table

Disk /dev/sdc: 16.1 GB, 16106127360 bytes
255 heads, 63 sectors/track, 1958 cylinders
Units = cylinders of 16065 * 512 = 8225280 bytes

Disk /dev/sdc doesn't contain a valid partition table
[root@linux1 ~]# fdisk /dev/sdb
Device contains neither a valid DOS partition table, nor Sun, SGI or OSF disklabel
Building a new DOS disklabel. Changes will remain in memory only,
until you decide to write them. After that, of course, the previous
content won't be recoverable.

Warning: invalid flag 0x0000 of partition table 4 will be corrected by w(rite)

Command (m for help): n
Command action
   e   extended
   p   primary partition (1-4)
p
Partition number (1-4): 1
First cylinder (1-652, default 1):
Using default value 1
Last cylinder or +size or +sizeM or +sizeK (1-652, default 652):
Using default value 652

Command (m for help): w
The partition table has been altered!

Calling ioctl() to re-read partition table.

WARNING: Re-reading the partition table failed with error 16: Device or resource busy.
The kernel still uses the old table.
The new table will be used at the next reboot.
Syncing disks.
[root@linux1 ~]# fdisk /dev/sdc
Device contains neither a valid DOS partition table, nor Sun, SGI or OSF disklabel
Building a new DOS disklabel. Changes will remain in memory only,
until you decide to write them. After that, of course, the previous
content won't be recoverable.


The number of cylinders for this disk is set to 1958.
There is nothing wrong with that, but this is larger than 1024,
and could in certain setups cause problems with:
1) software that runs at boot time (e.g., old versions of LILO)
2) booting and partitioning software from other OSs
   (e.g., DOS FDISK, OS/2 FDISK)
Warning: invalid flag 0x0000 of partition table 4 will be corrected by w(rite)

Command (m for help): n
Command action
   e   extended
   p   primary partition (1-4)
p
Partition number (1-4): 1
First cylinder (1-1958, default 1):
Using default value 1
Last cylinder or +size or +sizeM or +sizeK (1-1958, default 1958):
Using default value 1958

Command (m for help): w
The partition table has been altered!

Calling ioctl() to re-read partition table.

WARNING: Re-reading the partition table failed with error 16: Device or resource busy.
The kernel still uses the old table.
The new table will be used at the next reboot.
Syncing disks.
[root@linux1 ~]#


[root@linux1 ~]# fdisk -l

Disk /dev/sda: 59.0 GB, 59055800320 bytes
255 heads, 63 sectors/track, 7179 cylinders
Units = cylinders of 16065 * 512 = 8225280 bytes

   Device Boot      Start         End      Blocks   Id  System
/dev/sda1   *           1        1275    10241406   83  Linux
/dev/sda2            1276        2040     6144862+  82  Linux swap / Solaris
/dev/sda3            2041        7179    41279017+  83  Linux

Disk /dev/sdb: 5368 MB, 5368709120 bytes
255 heads, 63 sectors/track, 652 cylinders
Units = cylinders of 16065 * 512 = 8225280 bytes

   Device Boot      Start         End      Blocks   Id  System
/dev/sdb1               1         652     5237158+  83  Linux

Disk /dev/sdc: 16.1 GB, 16106127360 bytes
255 heads, 63 sectors/track, 1958 cylinders
Units = cylinders of 16065 * 512 = 8225280 bytes

   Device Boot      Start         End      Blocks   Id  System
/dev/sdc1               1        1958    15727603+  83  Linux
[root@linux1 ~]#
Configure oracleasm driver and create asmdisks
Run following command to configure oracleasm driver and create asm disks for storing GI and DB:
[root@linux1 ~]# oracleasm configure -i
Configuring the Oracle ASM library driver.

This will configure the on-boot properties of the Oracle ASM library
driver.  The following questions will determine whether the driver is
loaded on boot and what permissions it will have.  The current values
will be shown in brackets ('[]').  Hitting  without typing an
answer will keep that current value.  Ctrl-C will abort.

Default user to own the driver interface []: ora12c
Default group to own the driver interface []: dba
Start Oracle ASM library driver on boot (y/n) [n]: y
Scan for Oracle ASM disks on boot (y/n) [y]: y
Writing Oracle ASM library driver configuration: done
[root@linux1 ~]#

[root@linux1 ~]# oracleasm createdisk gidata /dev/sdb1
Writing disk header: done
Instantiating disk: done
[root@linux1 ~]# oracleasm createdisk dbdata /dev/sdc1
Writing disk header: done
Instantiating disk: done
[root@linux1 ~]#

[root@linux1 ~]# oracleasm listdisks
DBDATA
GIDATA
[root@linux1 ~]#
3-Create directory privilege for GI software
[root@linux1 ~]# cd /u01
[root@linux1 u01]# ls
12cDb_Home  lost+found  oracle  sw_home
[root@linux1 u01]# mkdir 12cGrid_Home
[root@linux1 u01]# chmod -R 775 12cGrid_Home/
[root@linux1 u01]# chown -R ora12c:dba 12cGrid_Home/
[root@linux1 u01]#/code>
4-Install Oracle 12c Grid Infrastructure Software
- Run xhost+
- set proper display variable
- login to oracle user
- runInstaller


> check on "change discovery path " and provide the valid path of oracleasm disks


- Provide the location of Oracle_base and Oracle_Home (GI sw)

- This is the new option Introduced in Oracle 12c GI. We can provide root/sudo user password and Installer itself will run post GI Installation script (root.sh)
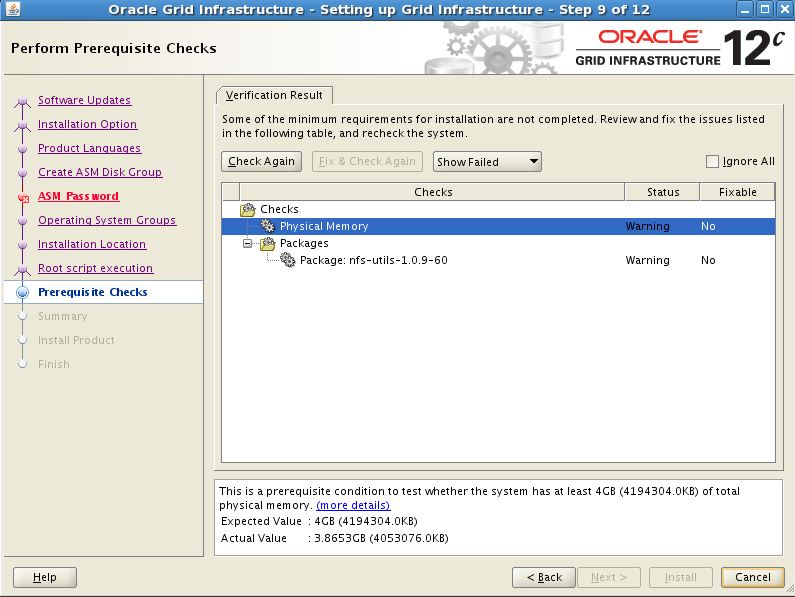
- Installer looking for exact 4 GB memory (can be ignored)
- package nfs-utils-1.0.9.-54 exists on system (OEL 5.7), its looking for higher version (ignored)


- Another enhancement here. We can edit if some configuration changes are required on summary screen, No need to click on back button for editing configuration changes :)


- New screen - confirmation for running root.sh as root user

- New screen - Linux configuration

5) Verify Services
[ora12c@linux1 ~]$ more ora12cgrid.env
export ORACLE_BASE=/u01/12cGrid_Home
export ORACLE_HOME=$ORACLE_BASE/ora12c/product/12.1.0/grid
export ORACLE_SID=+ASM
export PATH=/usr/sbin:$PATH
export PATH=$ORACLE_HOME/bin:$PATH
export LD_LIBRARY_PATH=$ORACLE_HOME/lib:/lib:/usr/lib
export CLASSPATH=$ORACLE_HOME/jlib:$ORACLE_HOME/rdbms/jlib
[ora12c@linux1 ~]$ . ora12cgrid.env
[ora12c@linux1 ~]$ sqlplus / as sysasm

SQL*Plus: Release 12.1.0.1.0 Production on Sat Jun 29 04:54:57 2013

Copyright (c) 1982, 2013, Oracle.  All rights reserved.


Connected to:
Oracle Database 12c Enterprise Edition Release 12.1.0.1.0 - 64bit Production
With the Automatic Storage Management option

SQL> select INSTANCE_NAME, status from v$instance;

INSTANCE_NAME    STATUS
---------------- ------------
+ASM             STARTED

SQL> 
6) Create addition ASM Disk Group for dtabase:


Successfully completed with the Installation and configuration of standalone - Oracle 12c Grid Infrastructure software. Now we can create/copy/move our databases on ASM Diskgroup.
Thanks for reading :)
Comments